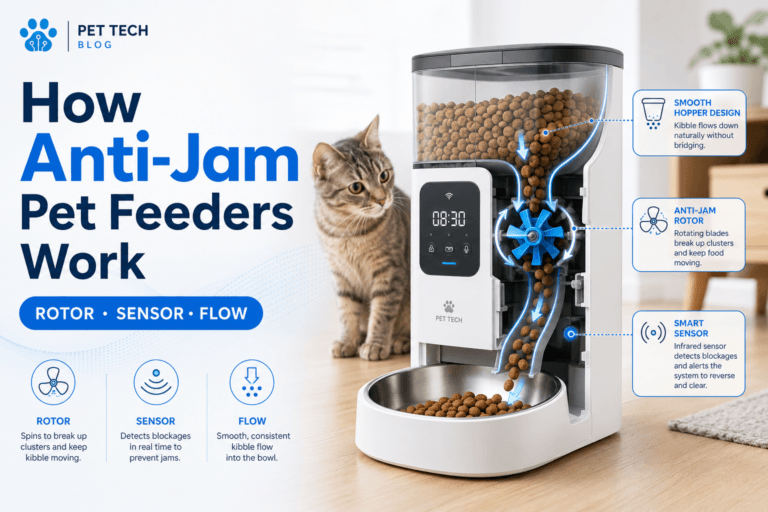

Clean pet feeder rotor assembly is not a cosmetic chore. The rotor assembly is the part of many automatic feeders that moves dry food from the tank toward the chute and bowl. When kibble dust, oil residue, crumbs, moisture, and old food collect around that rotating part, the feeder can jam, under-dispense, smell stale, or drop inconsistent portions.
For daily dry-food routines, a smart automatic pet feeder with app control works best when the internal food path stays clean and dry. The app controls timing, but the rotor assembly controls whether food physically moves. If that part is dirty, the schedule can look perfect while the bowl stays wrong.
Direct Answer: Clean Pet Feeder Rotor Assembly
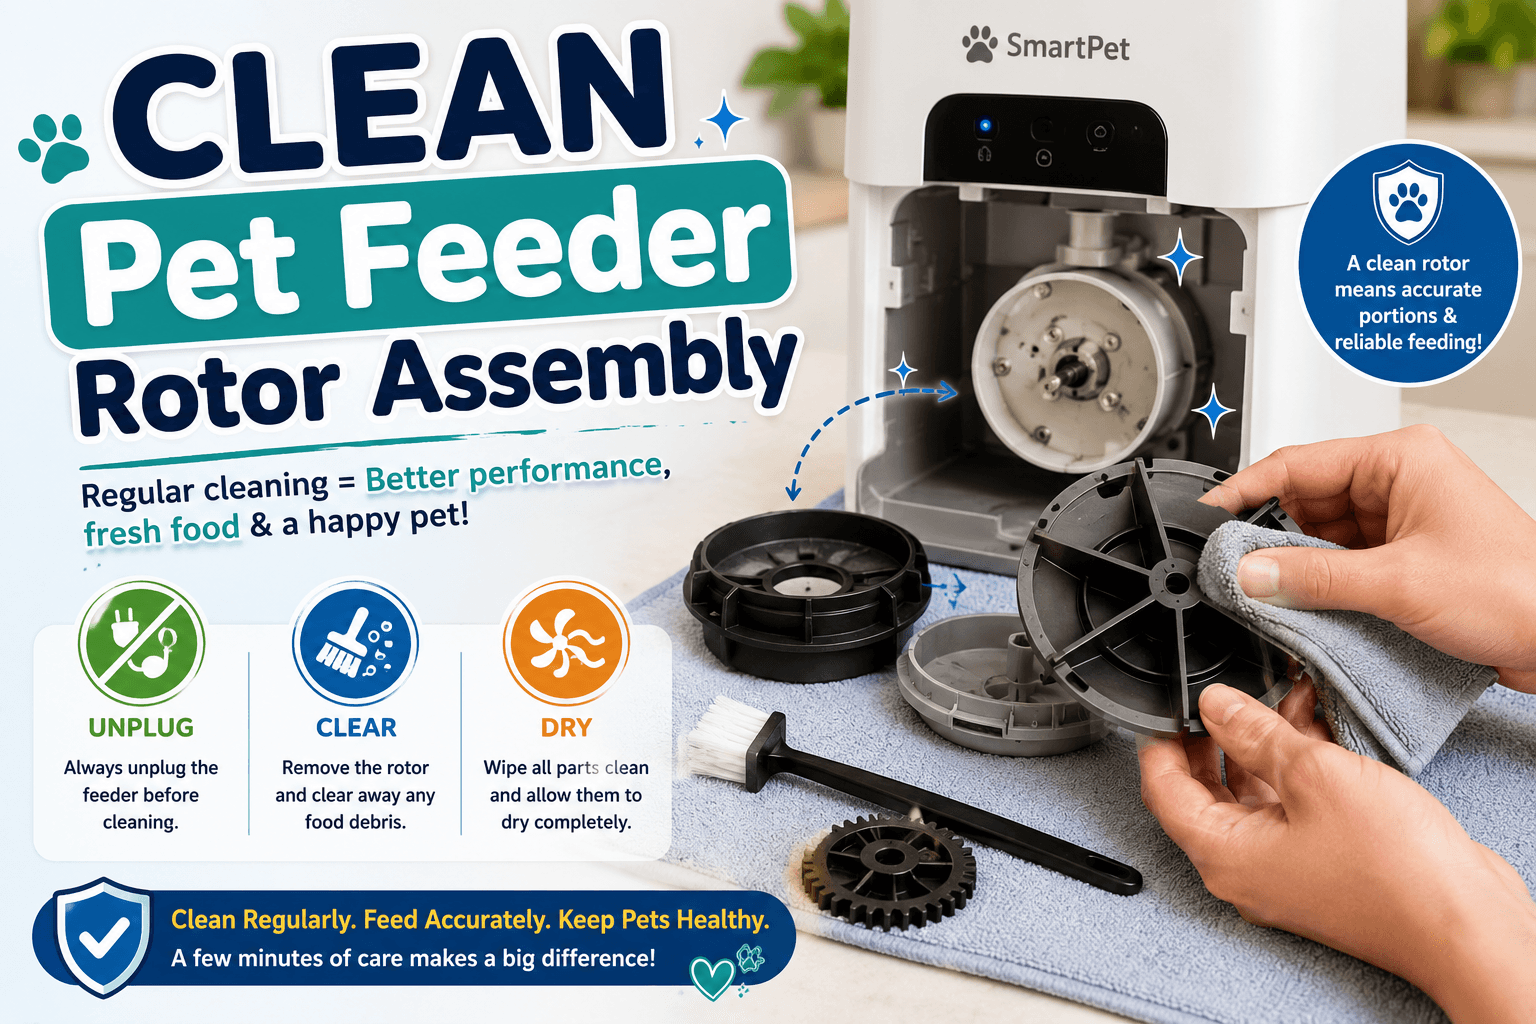
To clean pet feeder rotor assembly parts safely, turn off and unplug the feeder, remove all food, detach only the removable tank, rotor, chute, bowl, and tray parts allowed by the product manual, brush out dry crumbs, wash washable food-contact parts with mild dish soap, rinse fully, dry every part completely, inspect the rotor area for stuck kibble, reassemble correctly, and run several test portions before restarting the normal schedule.
Do not soak the motor base, spray water into electronics, use sharp tools inside the dispenser, or reassemble damp parts. The biggest cleaning mistake is washing the feeder and then letting wet plastic sit inside the food path. Dry kibble and hidden moisture turn into clumps. That is how a cleaning session creates the next jam.
Why This Happens
The rotor assembly sits in the most important food-transfer zone. Dry food enters from the hopper, drops into the rotating mechanism, and moves toward the chute. Every meal sends crumbs, dust, and food oils across that part. Over time, residue collects where owners do not usually look.
The FDA’s safe handling tips for pet food and treats emphasize clean hands, bowls, utensils, and food-contact surfaces. A feeder rotor assembly is also a repeated food-contact surface, so it should be treated as part of the feeding hygiene system.
A dirty rotor does not always fail suddenly. First, portions become slightly uneven. Then the chute leaves more crumbs. Then the feeder sounds strained. Then one meal drops less food than expected. By the time the app shows a warning, the rotor assembly may already be packed with residue.
What To Do First
Start by making the feeder safe to handle. Stop the feeding schedule if needed. Turn the unit off. Unplug the power cable. Remove batteries if the model requires it for cleaning. Empty the hopper completely instead of scooping only the visible top layer.
Next, move the feeder to a clear work area. Place a towel or tray under it so crumbs do not scatter. Take photos during disassembly if the rotor position, chute direction, or locking tabs are easy to forget. This prevents reassembly errors.
Use clean smart pet feeder for the broader cleaning routine. To clean pet feeder rotor assembly correctly, the owner also has to clean the tank, lid, chute, bowl, tray, and floor area around the station.
The Feeding Loop Behind Rotor Problems
The feeding loop starts when the feeder dispenses less food than usual. The owner assumes the pet is hungry and presses manual feed. The rotor turns again, but the residue remains. A partial portion drops. The owner adds more food by hand. Later, the jam loosens and the feeder dispenses again.
Now the pet may receive both manual food and delayed automatic food. The owner loses trust in the feeder. The pet learns that feeder trouble often produces extra attention and extra calories.
A better clean pet feeder rotor assembly routine prevents this loop. When output changes, stop guessing. Empty the feeder. Inspect the rotor. Clean the food path. Test the portion. Then decide whether a manual replacement meal is needed.
The Emotional Trigger Owners Miss
The emotional trigger is panic over a missed meal. Owners see an empty bowl and assume the pet has been underfed. They rush to compensate before checking whether the feeder actually failed, under-dispensed, jammed, or released food late.
This panic creates overfeeding risk. It also hides the equipment problem. If the owner keeps adding food manually, the rotor assembly may remain dirty for weeks while the schedule becomes meaningless.
Use scientific pet feeding schedule to keep the daily amount visible. Cleaning the rotor protects the machine. Tracking the schedule protects the pet’s food total.
The Addiction Mechanism
The addiction mechanism is accidental reward. If rotor trouble leads to owner attention, bonus food, or emergency treats, the pet may begin hovering near the feeder whenever something sounds different. Dogs may crowd the bowl. Cats may wait beside the machine and beg.
The owner then treats the behavior as proof of hunger and adds more food. The actual cause may be a dirty rotor assembly, not appetite.
A controlled clean pet feeder rotor assembly habit removes the reward pattern. Maintenance happens on schedule. Manual feeding is measured. Cleaning does not become a dramatic event around the pet.
Tools You Need
Use simple tools: a soft brush, clean dry cloth, mild dish soap, warm water, a small bowl for washable parts, paper towels, a drying rack, and a digital kitchen scale for test portions. A bottle brush can help with some chutes if the material and shape allow it.
Avoid sharp picks, knives, metal screwdrivers inside plastic food channels, abrasive pads, bleach, strong fragrances, and direct water spraying into the motor base. If food is stuck, loosen it gently. Damage inside the rotor area can make future dispensing worse.
For recurring jams, use pet feeder jammed. A jam is often a symptom. The underlying cause may be residue, moisture, kibble size, poor drying, or a misaligned rotor.
Step 1: Empty the Hopper Completely
Do not clean around old food. Remove every piece of kibble from the tank and outlet area. Shake loose crumbs into a trash bag. Brush the hopper corners. Check the bottom where food dust usually collects.
Many owners top fresh kibble over old kibble for weeks. That pushes older, dustier food toward the rotor. The bottom layer becomes the problem layer. When you clean pet feeder rotor assembly parts, always inspect the food that was sitting closest to the dispenser.
If the food smells stale, feels damp, looks dusty, or contains many broken pieces, discard the problem batch. Cleaning the rotor and then refilling with the same dusty food repeats the issue.
Step 2: Remove the Rotor Only If the Manual Allows It
Some feeders have a removable rotor, dispenser wheel, paddle, or impeller. Others keep the rotor inside a protected mechanism. Do not force parts out just because they look removable. Broken clips or misaligned gears can ruin portion accuracy.
If the rotor is removable, unlock it gently and note its orientation. If the rotor is not removable, clean the accessible food path with a dry brush and cloth according to the product instructions. Never pry into sealed electronics.
This is where many cleaning mistakes happen. The goal is to clean pet feeder rotor assembly surfaces, not to disassemble the motor drive. Food-contact parts and drive electronics are not the same thing.
Step 3: Brush Dry Crumbs Before Washing
Dry brushing comes before washing. If you add water to thick kibble dust, it can turn into paste and move deeper into seams. Brush out dry crumbs from the rotor, chute, hopper outlet, and bowl connector first.
Hold parts over a trash bag or sink. Tap lightly. Rotate the removable wheel by hand only if the part is designed to move freely when removed. Look for compacted dust around corners and ridges.
Dry brushing is the difference between cleaning and creating sludge. A proper clean pet feeder rotor assembly process removes loose residue before moisture touches the parts.
Step 4: Wash Food-Contact Parts
Wash only the parts that are safe to wash. Usually this includes removable bowls, trays, tanks, lids, chutes, and removable rotor pieces when the manufacturer allows it. Use warm water and mild dish soap. Rinse until no soap film remains.
The CDC’s pet food safety guidance advises washing pet bowls and scooping utensils with soap and hot water after use. Automatic feeder parts that contact food deserve the same level of cleaning discipline.
Do not use heavily scented cleaners. Pets may refuse food if the feeder smells like perfume, disinfectant, or detergent. Clean should smell neutral, not chemical.
Step 5: Dry Longer Than You Think
Drying is the most important step after washing. Place parts on a rack with airflow. Wipe seams, screw holes, tabs, chute corners, and rotor pockets. If the part has hollow areas, tilt it so trapped water can escape.
Do not refill the feeder while the rotor or chute is even slightly damp. Dry kibble absorbs moisture quickly. Damp plastic plus food dust creates sticky residue. That residue causes clumping, odor, and jams.
Use pet feeder desiccant replacement if the feeder uses a desiccant holder. Drying the rotor helps today. Managing tank humidity helps prevent the next cleaning problem.
Step 6: Inspect the Rotor Area Before Reassembly
Before reassembly, inspect every part in good light. Look for hair, crumbs, swollen kibble, oily film, cracks, rough plastic, warped tabs, or stuck pieces near the food outlet. Check that the rotor turns or seats correctly according to the feeder design.
If the rotor has teeth, paddles, or compartments, make sure none are packed with residue. If the chute has a narrow bend, inspect it from both ends. If the bowl connector has corners, wipe them dry.
A full clean pet feeder rotor assembly process should leave the entire food path visible, dry, and free of old food. Do not stop cleaning when the bowl looks clean. The rotor is where hidden residue causes mechanical trouble.
Step 7: Reassemble Without Forcing Parts
Reassemble slowly. Align tabs. Seat the rotor in the correct direction. Lock the chute fully. Place the tank evenly. Confirm the bowl and tray are stable. If a part resists, stop and check alignment instead of pushing harder.
Misalignment can cause scraping sounds, under-dispensing, motor strain, or jams. A feeder that worked before cleaning can fail after cleaning if the rotor is installed backward or not seated fully.
After reassembly, do not fill the hopper to the top immediately. Add a small amount of food for testing first. This keeps troubleshooting simple if the feeder still does not dispense correctly.
Step 8: Run Test Portions
After you clean pet feeder rotor assembly parts, test the feeder before trusting the normal schedule. Run several small portions into an empty bowl. Watch the chute. Listen for abnormal grinding, skipping, or motor strain.
Use a digital kitchen scale to weigh each test portion. If the feeder normally dispenses by portion count, run the same command several times and compare output. Large variation means the rotor, food path, kibble, or calibration still needs attention.
Use pet feeder calibration after cleaning. A clean rotor should return the feeder to more consistent output, but the owner still needs proof.
How Often Should You Clean the Rotor Assembly?
Cleaning frequency depends on food type, humidity, number of meals, number of pets, and whether the feeder sits near water, heat, or dust. A light weekly inspection is useful. A deeper cleaning should happen whenever you see dust buildup, odor, clumps, under-dispensing, slow dispensing, or a jam warning.
Homes using oily kibble, crumb-heavy food, large kibble, outdoor stations, or humid rooms should inspect more often. A feeder near a water bowl or automatic fountain also needs closer attention because moisture increases clumping risk.
Use pet feeder maintenance to build a repeatable schedule. The rotor should not be cleaned only after failure.
Food Choice Affects Rotor Cleanliness
Some dry foods create more dust than others. Some are oilier. Some break easily at the bottom of the bag. Some pieces are too large or irregular for certain feeders. Food that looks fine in a bowl can still perform poorly inside a rotor assembly.
Check kibble size against the feeder’s guidance. Sift out excessive crumbs if needed. Do not pour the dusty bottom of a food bag into the feeder hopper. That dust goes straight to the rotor and chute.
If the feeder jams after every refill, the food may be part of the problem. Cleaning alone cannot fix incompatible kibble.
Moisture Control After Cleaning
Moisture problems often start after cleaning, not before. Owners wash the tank, chute, and rotor, wipe the visible surfaces, then refill too soon. Trapped water sits in seams and mixes with food dust.
Let parts air-dry fully. Keep the feeder away from splashing water. Do not place it beside a humid sink area, bathroom, laundry room, patio door, or outdoor feeding station without additional protection.
If using the feeder outdoors or semi-outdoors, read outdoor smart pet feeder enclosure. Outdoor moisture makes rotor cleaning and drying more demanding.
Common Failure Pattern
The most common failure pattern is cleaning the bowl but ignoring the rotor. The owner sees a shiny bowl and assumes the feeder is clean. Meanwhile, the internal dispenser wheel is coated with kibble dust and old oil.
The second failure is reassembling damp parts. The feeder works for one day, then starts under-dispensing because new food has clumped around the rotor.
The third failure is forgetting calibration. A clean feeder may dispense differently from a dirty feeder. If the owner does not test output after cleaning, the pet may receive more or less food than expected.
Real-World Impact
The real-world impact of a clean rotor is better feeding confidence. Portions become more consistent. Jams are less likely. Odor decreases. Food stays fresher. The feeder motor works with less resistance. The owner can trust the schedule with less manual correction.
The impact of a dirty rotor is hidden instability: skipped meals, small portions, stuck kibble, stale smell, ants, clumping, repeated app warnings, and unnecessary manual feeding. The feeder may look normal from the outside while the internal food path is failing.
For owners who need visual meal verification, a smart WiFi pet feeder with camera can help confirm whether food reached the bowl. Even then, the rotor still needs cleaning because a camera sees the result, not the residue inside.
Can This Be Fixed?
Yes, most rotor-related feeding problems can be improved with a full food-path reset. Empty the tank. Brush dry residue. Wash approved removable parts. Dry completely. Inspect the rotor. Reassemble correctly. Test several portions. Calibrate output. Refill with compatible dry food. Check the feeder again after the next full day of meals.
Run a seven-day rotor check after cleaning. Record portion weight, meal time, app alerts, food dust, chute residue, moisture, odor, pet behavior, and whether the feeder sounds normal. If residue returns quickly, check food quality, humidity, tank overfilling, and desiccant status.
For feeder selection, start with the smart feeders collection. Choose a feeder with removable food-contact parts, accessible cleaning points, stable portion control, and a bowl design the owner will actually maintain.
Who Should Walk Away and Who Should Use This
Walk away from soaking the motor base, forcing sealed parts apart, using sharp tools inside the rotor, spraying electronics, refilling damp parts, or assuming one quick wipe cleans the food path. These shortcuts create more failure risk than they solve.
Use this clean pet feeder rotor assembly routine if your feeder under-dispenses, jams, smells stale, drops inconsistent portions, makes strained motor sounds, shows food dust around the chute, or has not been deep-cleaned after weeks of use. It is especially useful for dry-food smart feeders, automatic cat feeders, automatic dog feeders, camera feeders, and feeders used in humid homes.
Cat owners can compare the cat feeders collection for smaller measured meals and easy-clean bowl access. Dog owners can use the dog feeders collection when feeder stability, larger kibble, and stronger cleaning access matter.
Mini FAQ
How do I clean pet feeder rotor assembly parts?
Clean pet feeder rotor assembly parts by unplugging the feeder, emptying all food, removing only approved washable parts, brushing dry crumbs first, washing food-contact pieces with mild soap, rinsing fully, drying completely, reassembling correctly, and testing portions.
Can I wash the rotor assembly with water?
You can wash the rotor assembly with water only if the removable rotor part is approved as washable by the product instructions. Do not spray or soak the motor base, electronics, ports, or sealed drive components.
Why does my feeder jam after cleaning?
Your feeder may jam after cleaning because parts were reassembled damp, the rotor was misaligned, crumbs turned into paste, the chute was not fully dry, or incompatible kibble was added back into the tank.
How often should I clean the feeder rotor?
Inspect the feeder rotor weekly and clean it whenever you see dust, odor, clumps, jams, under-dispensing, or sticky residue. Humid homes, oily kibble, and outdoor stations need more frequent checks.
Do I need to recalibrate after cleaning?
Yes, recalibration or portion testing is smart after cleaning because food output can change when the rotor and chute are cleared. Weigh several test portions before restarting the normal schedule.
What should I avoid when cleaning the rotor?
Avoid sharp tools, harsh cleaners, soaking electronics, forcing sealed parts apart, using scented chemicals, and refilling the feeder before every part is fully dry. These mistakes can damage the feeder or cause new jams.
The cleanest feeder routine is mechanical, not cosmetic. Empty the tank, clear the crumbs, wash only approved parts, dry longer than feels necessary, reassemble carefully, and test output before trusting the next meal. When owners clean pet feeder rotor assembly parts correctly, the feeder becomes more reliable, portions become easier to trust, and preventable jams stop controlling the feeding schedule.