
How anti-jam pet feeders work is less mysterious than the product name suggests. A good anti-jam feeder does not magically make every kibble flow perfectly. It reduces the most common failure points inside the food path: bridging in the hopper, kibble wedged in the rotor, crumbs packed in the chute, moisture clumps, oversized pieces, and motor strain when food refuses to move.
For daily dry-food routines, a smart automatic pet feeder with app control works best when anti-jam design is paired with clean food storage, compatible kibble, correct calibration, and routine maintenance. Anti-jam technology helps the machine recover from food resistance, but it does not replace owner care.
Direct Answer: How Anti-Jam Pet Feeders Work
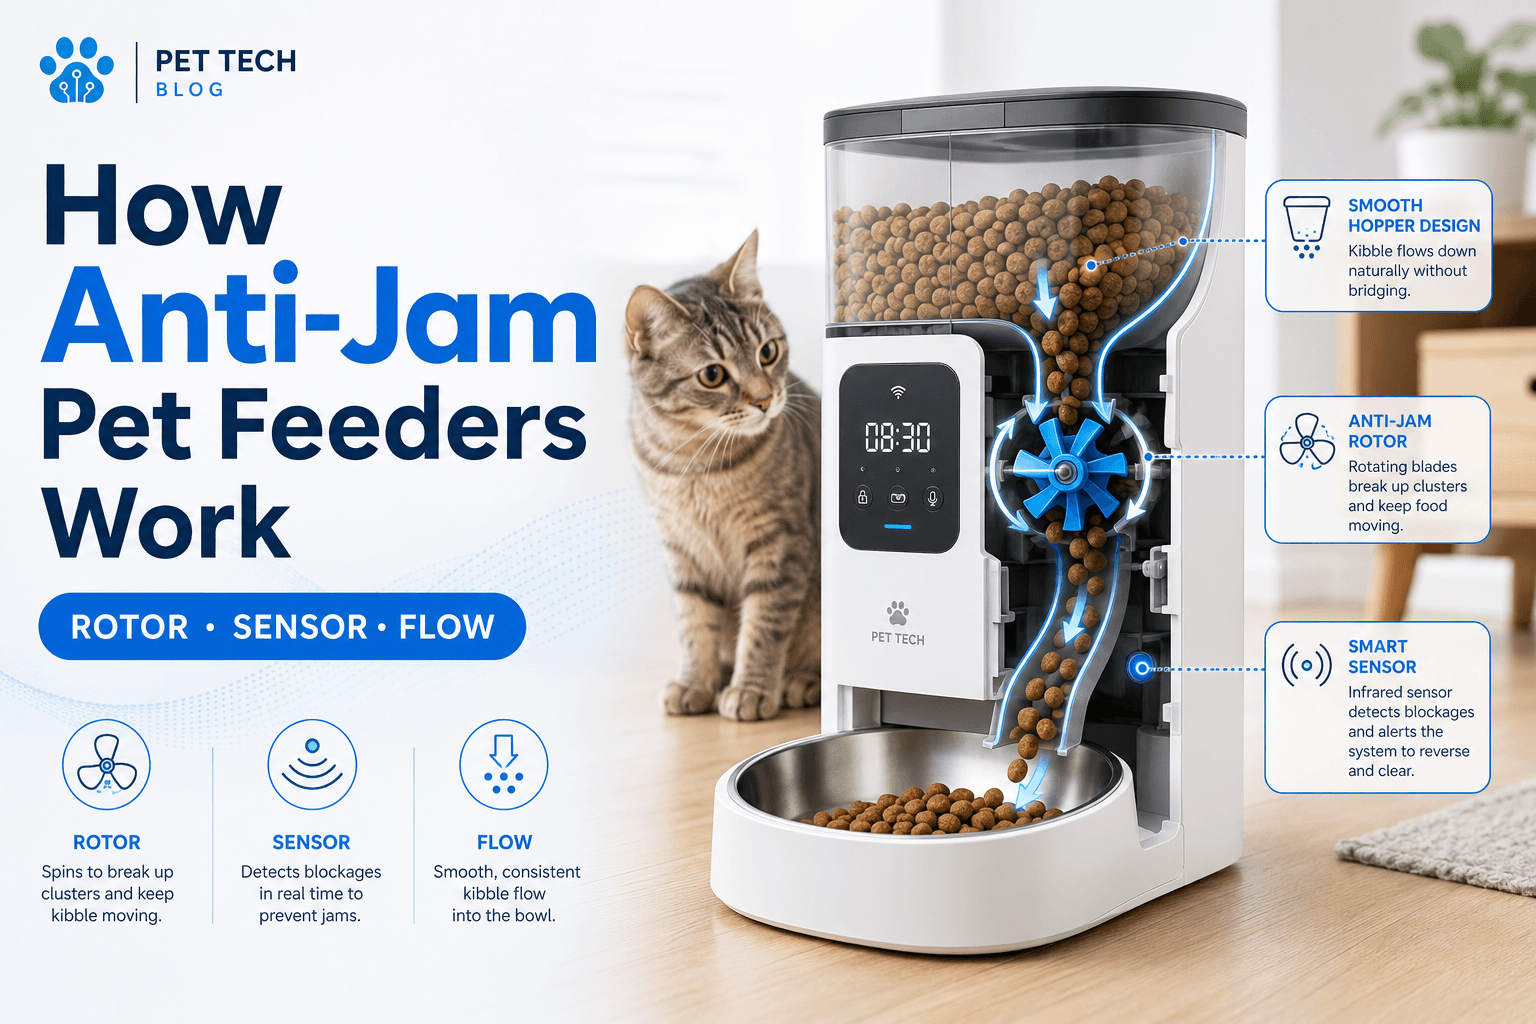
How anti-jam pet feeders work is by using a controlled food path, shaped hopper outlet, rotating dispensing wheel or rotor, motor feedback, short reverse or retry motion, chute design, portion timing, and sometimes app alerts to prevent or detect stuck kibble before a meal fails completely. The best anti-jam systems combine mechanical design with clean dry food management, because most jams start when kibble is too large, too dusty, too oily, too damp, or trapped inside a dirty chute.
The key point is that anti-jam does not mean jam-proof. It means the feeder is designed to reduce blockage risk and respond better when resistance appears. Owners still need to use the right kibble size, keep the food dry, clean the rotor assembly, replace desiccant packs, and test portion output after maintenance.
Why This Happens
Automatic feeders are small dry-food handling systems. Kibble sits in a hopper, moves toward an outlet, enters a rotating mechanism, passes through a chute, and lands in the bowl. A jam can happen anywhere in that path. The feeder may still have power, app connection, and a scheduled meal, but food may not reach the bowl.
The FDA’s proper storage guidance for pet food and treats explains that dry pet food should be kept in a cool, dry place and protected from excess heat or moisture. That matters because damp or stale kibble is harder for any feeder to move reliably.
How anti-jam pet feeders work depends on both engineering and food condition. A well-designed rotor can handle normal dry kibble variation, but it cannot perform well if the hopper contains clumps, broken dust, damp food, or pieces outside the feeder’s supported size range.
What To Do First
Start by identifying what kind of jam the feeder is trying to prevent. Some feeders struggle with large kibble. Some struggle with crumb-heavy food. Some jam after cleaning because parts were reassembled damp. Some fail because food bridges over the hopper outlet instead of dropping into the rotor.
A practical anti-jam check has six parts: kibble size, food dryness, hopper shape, rotor design, chute cleanliness, and motor response. If one part is weak, the feeder may still jam even if the product advertises anti-jam protection.
Use pet feeder jammed before assuming the feeder is defective. Understanding where the blockage starts is the fastest way to understand how anti-jam pet feeders work in real homes.
The Feeding Loop Behind Jam Problems
The jam loop starts when the feeder drops less food than expected. The owner sees an empty or half-filled bowl and presses manual feed. The motor tries again. If the stuck food loosens, extra food may drop. If the blockage stays in place, the feeder may strain, retry, or alert.
The owner then adds food by hand. Later, the feeder clears itself and the scheduled portion drops. The pet receives both the manual replacement and the delayed feeder portion. A mechanical jam becomes a portion-control failure.
A better routine is mechanical first, emotional second. Stop the schedule if needed. Empty the hopper. Clear the chute. Clean the rotor. Test one small portion. Then decide whether the pet truly missed food. This is where how anti-jam pet feeders work meets owner behavior.
The Emotional Trigger Owners Miss
The emotional trigger is fear that the pet went hungry. That fear makes owners feed first and troubleshoot later. The problem is that anti-jam feeders can sometimes recover after a delay. If the owner already replaced the meal manually, recovery creates double feeding.
Good anti-jam design reduces panic by making failures more visible. Some feeders use app alerts, abnormal motor behavior, or repeated dispense attempts to signal that the food path needs attention. But the owner still has to verify the bowl and measure any manual replacement.
Use scientific pet feeding schedule so missed-meal decisions are based on the daily food plan instead of fear at the bowl.
The Addiction Mechanism
The addiction mechanism is accidental bonus feeding. If every jam leads to extra manual food, the pet learns that feeder trouble can produce more calories. Cats may wait near the machine. Dogs may crowd the bowl. Owners may interpret that behavior as proof the feeder failed again.
Anti-jam technology should reduce this loop, not create a new one. The feeder’s job is to keep meals boring and measured. The owner’s job is to avoid rewarding every warning, sound, or partial dispense with extra food.
A strong understanding of how anti-jam pet feeders work helps owners respond correctly. The feeder may retry. The chute may clear. The motor may stop to protect itself. The bowl must be checked before food is added manually.
Part 1: Hopper Shape Controls Food Pressure
The hopper is where jam prevention begins. Food does not simply fall like water. Kibble pieces can lock together, form arches, or bridge over an outlet. A good hopper shape encourages food to move downward without packing too tightly against the rotor.
Steep walls, smooth surfaces, and a properly sized outlet help reduce bridging. If the outlet is too narrow for the kibble, food can hang above the rotor. If the hopper is overfilled with dusty broken food, the lower layer can compact and resist movement.
This is one basic answer to how anti-jam pet feeders work: they try to control how food enters the dispenser before it ever reaches the motor.
Part 2: The Rotor Meters the Kibble
The rotor, dispenser wheel, or paddle assembly is the main moving part in many automatic feeders. It collects a controlled amount of kibble and moves it toward the chute. Anti-jam design often focuses here because this is where individual pieces can wedge.
A rotor may use compartments, paddles, flexible edges, controlled gaps, or a short movement pattern to carry food. The goal is to move pieces consistently without crushing them or allowing too much food to enter the mechanism at once.
Use clean pet feeder rotor assembly. A dirty rotor changes how anti-jam pet feeders work because residue narrows gaps and makes dry food stick.
Part 3: Motor Feedback Detects Resistance
Some anti-jam feeders monitor motor behavior. If the motor meets unusual resistance, the feeder may pause, retry, reverse briefly, or stop and alert the owner. This protects the motor and gives stuck kibble a chance to move.
Reverse motion is useful because a piece wedged in one direction may release when the rotor backs away. A short retry can clear a temporary jam. But repeated grinding is not a fix. If the same jam returns, the owner needs to inspect food size, dust, moisture, and the chute.
This is the active side of how anti-jam pet feeders work: the feeder does not only push harder. It may change motion to reduce damage and recover from resistance.
Part 4: Chute Design Prevents Bottlenecks
The chute is the path between the rotor and the bowl. A narrow, steep, sticky, or dirty chute can create another jam point even when the rotor turns correctly. Food may leave the rotor but stop before reaching the bowl.
Good chute design uses smooth surfaces, practical angles, and enough clearance for the supported kibble size. It should also be accessible for cleaning because food dust and oils collect where owners do not look.
Use clean smart pet feeder. Anti-jam design weakens quickly when the chute is coated with crumbs, oil film, or damp residue.
Part 5: Sensors and Alerts Reduce Silent Failure
Some smart feeders add alerts for low food, blocked dispensing, abnormal operation, or offline status. These alerts do not physically clear all jams, but they reduce silent failure. The owner learns that the feeder needs inspection before the next meal becomes uncertain.
Alerts should be treated as inspection triggers, not automatic reasons to feed extra. A low-food alert means check the tank. A jam alert means check the food path. An offline alert means check power and WiFi before assuming a missed meal.
For connected feeders, use smart pet feeder offline and pet feeder WiFi connection. Understanding alerts is part of understanding how anti-jam pet feeders work.
Part 6: Kibble Size Compatibility Is Non-Negotiable
Anti-jam feeders are designed for a supported kibble size range. Oversized pieces can wedge. Very small crumbs can pack into dust. Flat or irregular pieces can stack. Oily foods can cling to surfaces. Lightweight food can dispense differently from dense food.
Do not assume all dry food works in all feeders. Check the feeder’s kibble guidance and test the real food. Run several dispense cycles before leaving the feeder unattended for work, sleep, or travel.
A serious answer to how anti-jam pet feeders work must include food choice. The feeder cannot correct every kibble shape with mechanics alone.
Part 7: Moisture Control Keeps Food Flowing
Moisture turns dry food into a feeder problem. Kibble can soften, clump, swell, or stick to the hopper wall. Dust can become paste around the rotor. A chute can develop odor and residue. Anti-jam motion may help briefly, but damp food will keep causing trouble.
Use the feeder’s designated desiccant holder when available. Replace packs on schedule or sooner when humidity, odor, clumping, or indicator changes appear. Keep the feeder away from water bowls, humidifiers, sinks, bathrooms, laundry rooms, and exposed outdoor spaces unless the station is properly protected.
Use pet feeder desiccant pack life. Moisture control is one of the most important real-world factors in how anti-jam pet feeders work.
Part 8: Calibration Confirms Real Output
Anti-jam systems can reduce blockage risk, but owners still need to confirm how much food drops. A feeder may recover from a small jam and still dispense a smaller or larger portion than expected. Kibble density and rotor design affect output.
Use a digital kitchen scale. Run several test portions. Compare weights. If output varies widely, inspect the food path, clean the rotor, check kibble size, and dry all parts before testing again.
Use pet feeder calibration. A clean anti-jam system should be measured, not trusted blindly.
Anti-Jam vs Jam-Proof
Anti-jam means the feeder is designed to reduce or recover from common blockages. Jam-proof implies the feeder cannot jam, which is not realistic for dry-food machines. Any feeder can struggle when food is damp, oversized, dusty, oily, stale, or loaded into a dirty hopper.
A good anti-jam feeder gives owners more margin. It may tolerate normal kibble variation better. It may alert earlier. It may reverse or retry instead of locking immediately. But it still needs food compatibility and maintenance.
The honest answer to how anti-jam pet feeders work is that they reduce failure probability. They do not remove the physics of dry food movement.
Camera Feeders and Anti-Jam Verification
A camera does not prevent a jam, but it can help confirm whether food reached the bowl. This is useful for owners who are away from home and need proof instead of only app logs.
Camera verification is strongest when paired with anti-jam mechanics, clean food paths, and stable WiFi. If the camera shows an empty bowl after a scheduled meal, the owner can check whether the feeder jammed, went offline, ran out of food, or failed to dispense for another reason.
A smart WiFi pet feeder with camera can help with meal verification. Use WiFi pet feeder with camera when visual confirmation matters.
Common Failure Pattern
The most common failure pattern is buying an anti-jam feeder and then using incompatible food. The feeder works for a few days, then jams when dust collects at the bottom of the bag or when a new kibble shape enters the hopper.
The second failure is cleaning poorly. Damp parts are reassembled, dry food is added, and the feeder clumps inside the rotor. The owner blames the anti-jam system, but the problem began with moisture.
The third failure is ignoring portion testing. The feeder may not fully jam, but it may under-dispense. A partial portion can be harder to notice than a complete failure.
Real-World Impact
The real-world impact of good anti-jam design is feeding confidence. Meals are less likely to fail silently. The rotor handles normal resistance better. The chute stays clearer. The owner receives earlier warning when something needs inspection.
The impact of weak setup is still serious: missed meals, double feeding after manual compensation, food waste, app panic, stale odor, rotor strain, and pet behavior around the feeder. Anti-jam technology works best when the household supports it with dry food, clean parts, and measured output.
For everyday product selection, compare the smart feeders collection. Choose based on food compatibility, cleaning access, anti-jam design, portion consistency, backup power, and app visibility.
Can This Be Fixed?
Yes, most anti-jam problems can be improved with a full food-path reset. Empty the hopper. Discard damp or dusty food. Clean the rotor and chute. Dry all parts fully. Replace the desiccant pack if needed. Refill with compatible kibble. Run several test portions. Weigh output. Restart the normal schedule only after the feeder dispenses consistently.
Run a seven-day anti-jam check. Record kibble type, portion weight, app alerts, jam sounds, chute residue, moisture signs, bowl output, manual feeds, and whether the feeder recovers after resistance. If the same jam repeats, change the food, placement, humidity control, or feeder design rather than pressing manual feed repeatedly.
For dog homes, compare the dog feeders collection when larger kibble and higher food volume matter. Cat owners can compare the cat feeders collection for smaller portions and quieter feeding routines.
Who Should Walk Away and Who Should Use This
Walk away from believing anti-jam means no maintenance. Also walk away from oversized kibble, damp refills, topping fresh food over old crumbs, ignoring desiccant packs, washing parts and refilling while damp, or repeatedly forcing manual dispense after a jam.
Use an anti-jam feeder if your pet depends on scheduled dry-food meals, you work long hours, your feeder has jammed before, your kibble creates crumbs, or you need better reliability during sleep, work, or short absences. Understanding how anti-jam pet feeders work is especially useful for smart feeders, camera feeders, multi-pet homes, weight-control routines, and backup feeding plans.
For routine reliability, a 2L smart pet feeder for regular feeding should be paired with compatible food, clean dry parts, calibrated portions, and a written manual feeding rule for errors.
Mini FAQ
How anti-jam pet feeders work in simple terms?
Anti-jam pet feeders work by shaping the food path, controlling kibble entry with a rotor or dispensing wheel, detecting motor resistance, retrying or reversing movement, and alerting the owner when food may be stuck.
Are anti-jam pet feeders completely jam-proof?
No, anti-jam pet feeders are not completely jam-proof. They reduce jam risk, but damp food, oversized kibble, dust, dirty chutes, poor drying, and incompatible food can still cause blockages.
What causes most feeder jams?
Most feeder jams come from kibble size mismatch, broken crumbs, food dust, moisture, stale food, dirty rotor parts, clogged chutes, or refilling fresh food over old dusty food.
Does reverse rotation stop feeder jams?
Reverse rotation can help release kibble wedged in the rotor, but it does not fix moisture, dirty parts, or incompatible food. If jams repeat, the food path needs cleaning and testing.
How do I know if the anti-jam system is working?
You know the anti-jam system is working when portions dispense consistently, the motor does not strain, alerts are rare, the chute stays clear, and test portions weigh within a stable range.
What should I do after an anti-jam alert?
After an anti-jam alert, check the bowl, stop repeated manual feeding, inspect the hopper and chute, clear stuck kibble, clean and dry the rotor area, refill with compatible food, and run test portions before restarting the schedule.
The clean answer to how anti-jam pet feeders work is that they manage food flow before, during, and after resistance appears. Hopper shape reduces bridging. Rotor design meters kibble. Motor feedback detects strain. Reverse motion may clear stuck pieces. Alerts reduce silent failure. But the owner still controls the biggest variables: dry food, clean parts, correct kibble, calibration, and calm troubleshooting.